
By playing freely with the shape of the Puppet Beak's eyes and mouth, you can create many different models.
Begin with a square of origami paper, white side up.

Step 1: By bringing two adjacent corners together, make two pinches on two adjacent edges.

Step 2: Now pinch two quarter creases, one above the bottom left corner and the other to the right of the top left corner.

Step 3: Fold dot to dot, making one quarter mark touch the other, but only make a short pinch...

Step 4: ... like this. The pinch shouldn't be longer than the arrowed line. Open the paper.

Step 5: Note the five pinches. Create and unfold the diagonal, as shown. Be careful not to crease the other diagonal by mistake!

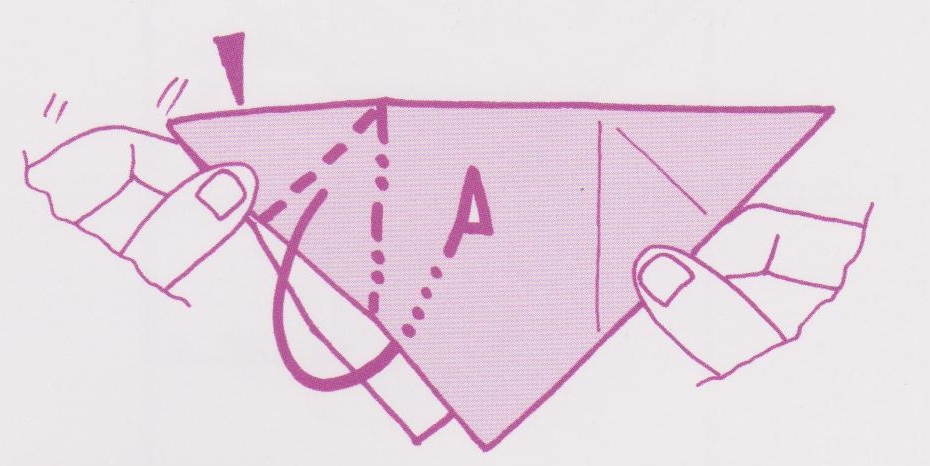
Step 6: Fold dot to dot as shown, beginning the fold exactly at the end of the sloping pinch, inside the circle.

Step 7: Fold dot to dot.

Step 8: The paper has been divided into exactly thirds! Unfold the triangles.

Step 9: Turn over.

Step 10: Make four short valley folds, folding dot to dot, as shown.

Step 11: Mountain fold the paper in half. The fold already exists.
Step 12: Hold the paper as shown. Push the left-hand corner inside the body of the paper, using the existing mountain and valley folds. No new folds need to be made.

Step 13: Repeat step 12 on the right.

Step 14: Fold up the bottom corner. Repeat behind.

Step 15: Fold the bottom edge up to the top edge. Repeat behind.

Step 16: Front and back, valley fold the loose triangles into the corner...

Step 17: ... like this. Open the paper to the final 3-D shape.

Step 18: Draw eyes (and maybe nostrils, a tongue inside the mouth, and so on). Hold two of the triangles as shown and move your hands together and apart to make the model speak.

Puppet Beak completed!!
No comments:
Post a Comment