About Me

My photo
YING HUEY SEIN D20102044767 EL-W06
Showing posts with label ~Origami~. Show all posts

Tuesday, 27 December 2011

Christmas Stocking

The traditional model was originally a napkin fold, but has been adapted here to be made from conventional paper. The lock at the end ensures that the necessary layers of paper say together. You will need a square of fairly crisp paper, not too thick, and preferably with a different color on the reverse side. Fancy Christmas gift wrap works exceedingly well.

Step 1: With the color you wish to be predominant in the design on top, fold up a narrow strip at the lower edge. A strip 1-2cm / 0.5-0.75in works fine with a square cut from A4 paper (21 x 29cm / 8.25 x 11.5 in).


Step 2: Turn the paper over, then fold in half to establish the vertical center crease. The strip folded in step 1 should be horizontal along the lower edge at this stage, even though it is hidden in the photograph.
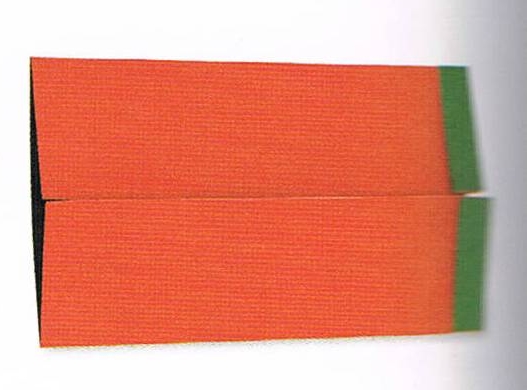


Step 3: Rotate the paper 90` anticlockwise and fold the top and bottom sides to lie along the center crease.


Step 4: Fold the left-hand corners inward to meet the center crease.


Step 5: Fold the left-hand corner across to meet the inner edges of the flaps folded in step 4.


Step 6: Fold this newly created edge across to the right-hand edge.


Step 7: Fold the upper layer back across to the left, making a vertical pleat in the paper. The outer corners of this section should come to rest on top of the right-angled corners beneath.


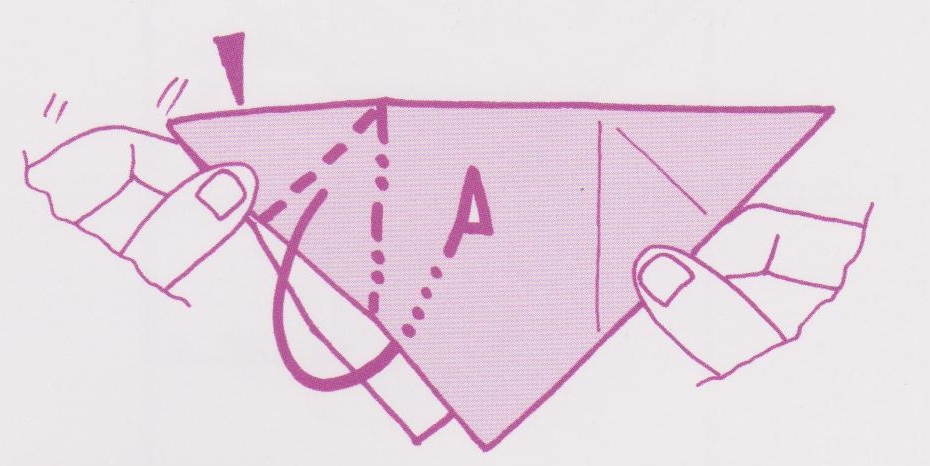
Step 8: Turn the model round so that the narrow strip lies at the top. Valley fold the  model in half along the vertical center crease, so that all the folds are inside. Hold as shown, with the finger and thumb of one hand close to the trim at the top, while the finger and thumb of the other grip the "toe".


Step 9: Swing the toe forward and outward, so that the pleat folded in steps 6-7 allowed to stretch. New creases will form, and the toe will move position.. Flatten the model.


Step 10: To lock the, open out the two rear edges and lock inside the Stocking. On one side only, carefully lift up the border folded in step 1, creating a pocket. Now refold the Stocking, this time tucking the upper corner of the remaining half into this pocket.


Step 11: Flatten the model to complete.


The Christmas stocking completed.


Rose Napkin

This rose napkin is believed to have been collected by Stephen Weiss.
Such party tricks and napkin folds are often taught to the young and passed on from one generation to the next. It is quite a tricky final technique to master, and, because you are using a tissue napkin, you will need to treat the material with great care.
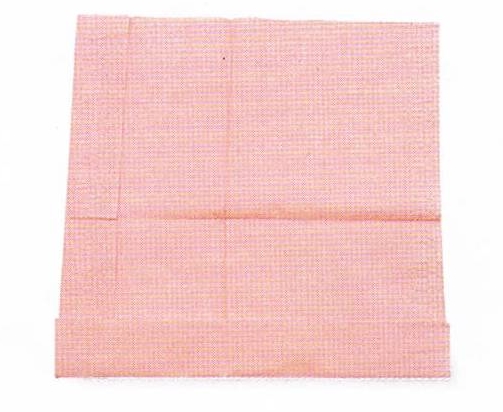
Step 1: Begin with a tissue napkin, as square as it can possibly be (not all packet the napkin are cut perfectly square). Open the napkin out completely, and arrange as shown.


Step 2: Fold the left edge inwards by 2-3cm / 0..75-1.25in.


Step 3: Now fold the lower edge up by 2-3cm / 0.75-1.25in.


Step 4: Place two fingers across the napkin, holding the horizontal strip at the lower left corner, using your thumb to hold the napkin underneath.


Step 5: Begin to roll the lower edge upward, doubling over the 2-3cm / 0.75-1.25in once again.


Step 6: To help you roll the entire height of the napkin, use your other hand to wrap the upper portion of the tissue over towards you, over the horizontal roll of material.


Step 7: The rolling almost completed.


Step 8: About 4-5cm / 1.5-2in in from the left edge, pinch the tissue tightly, squeezing the layers flat, whilst allowing the left-hand section to remain loosely rolled.


Step 9: Begin twisting the napkin tightly, to form the stem.


Step 10: Continue twisting to about halfway down the length of the roll.


Step 11: Take hold of the outermost corner of the napkin at the lower end of the tube: the base of the stem. Pull this layer upward, fluffing the ply of tissue into a soft point.


Step 12: Continue twisting the lower end of the rose, to complete the stem.


Step 13: For the rosebud, carefully turn the outer rolled layers over, to suggest the outer petals. Carefully arrange the inner rolled layers to suggest the inner petals.


The rose napkin completed.

Sunday, 20 November 2011

Puppet beak

By playing freely with the shape of the Puppet Beak's eyes and mouth, you can create many different models.

Begin with a square of origami paper, white side up.

 Step 1: By bringing two adjacent corners together, make two pinches on two adjacent edges.


Step 2: Now pinch two quarter creases, one above the bottom left corner and the other to the right of the top left corner.


 Step 3: Fold dot to dot, making one quarter mark touch the other, but only make a short pinch...


 Step 4: ... like this. The pinch shouldn't be longer than the arrowed line. Open the paper.


 Step 5: Note the five pinches. Create and unfold the diagonal, as shown. Be careful not to crease the other diagonal by mistake!


 Step 6:  Fold dot to dot as shown, beginning the fold exactly at the end of the sloping pinch, inside the circle.


 Step 7: Fold dot to dot.


 Step 8: The paper has been divided into exactly thirds! Unfold the triangles.


 Step 9: Turn over. 


 Step 10: Make four short valley folds, folding dot to dot, as shown.


Step 11: Mountain fold the paper in half. The fold already exists.


 Step 12: Hold the paper as shown. Push the left-hand corner inside the body of the paper, using the existing mountain and valley folds. No new folds need to be made.


Step 13: Repeat step 12 on the right.


 Step 14: Fold up the bottom corner. Repeat behind.


 Step 15: Fold the bottom edge up to the top edge. Repeat behind.


 Step 16: Front and back, valley fold the loose triangles into the corner...


Step 17: ... like this.  Open the paper to the final 3-D shape.


Step 18: Draw eyes (and maybe nostrils, a tongue inside the mouth, and so on). Hold two of the triangles as shown and move your hands together and apart to make the model speak. 


Puppet Beak completed!!

Thursday, 10 November 2011

Basket


This model was designed by Aldo Putignano, and is one of a large collection of baskets, bowls and other containers created by this prolific folder. It is a classic to share around Easter time, and looks delightful filled with shredded yellow tissue and chocolate eggs. You will need a square of paper, preferably duo-colored, and a strip of paper approximately the same length as a side of the square (see step 8).


 Step 1: Begin with a Preminary base, the outer color will be the outer color of the finished basket. The closed point should be towards you.


 Step 2: Fold the single layer at the top down to the closed point at the bottom.


 Step 3: Fold the corner back up to horizontal center line.


 Step 4: Mountain fold the point inside, down as far as the crease made in the previous step. You might prefer to open out this triangular flap and use a valley crease, before refolding to the position shown.


 Step 5: Double over the lower edge once more, producing a fairly thickly layered band around the middle of the model. Repeat steps 2-5 on the reverse face.


 Step 6: There are two main flaps on either side of the vertical center line. Fold the top flap at the right over to the left, using the vertical center crease as a hinge crease and axis. Turn over and repeat on the reverse, again folding right over to left.


Step 7: Repeat steps 2-4 on the two new faces.


Step 8: Take a strip of paper, ideally the length of one side of the square you began folding the basket from. The width is up to you, but if you are using A4 (21x29cm/8 1/4 x 11 1/2 inch) paper, you might consider using the portion cut off in making a square, sliced in half, short end to short end. Fold the two long edges to the center. Then fold in half again, so that the handle is fairly stiff.


 Step 9: Insert one end of the handle behind the flaps we formed as part of step 4. Push right down, until it can go no further.


 Step 10: Repeat step 5, doubling the section over, and locking the handle into place. Repeat steps 9-10 on the reverse face.


 Step 11: Double over this entire section again, further locking the handle in place through the multiple creasing. Repeat on the reverse side.


 Step 12: Fold the two outer corners of the upper layer inward to meet with the vertical center line, at the top edge of the basket. Repeat on the reverse face.


 Step 13: As you look at the model you will see that there are two diamond shapes close to the top of the basket. Take hold of the top inner corner of this flap, and pull it towards you, making a crease that runs along the lower sloping edge. This will seem a fairly natural step. Repeat with the neighboring flap.


 Step 14: Allow the horizontal folded edge behind the flaps to fold over to the front, squashing it flat on top of the two sections you have just folded. Repeat steps 13 and 14 on the reverse face.


 Step 15: Steps 13 and 14 completed.


 Step 16: There are now small flaps projecting outward from the natural shape of the basket. Mountain-fold all four behind and inside on themselves, using the edge of the basket as a guide (you might fold them over the basket's edge first, then refold, tucking them just behind the outer layer).


 Step 17: Step 16 completed.


 Step 18: This now leaves four small flaps pointing upward. Mountain fold these, and insert into a small triangular pocket that you will find behind them, formed by the diagonal folded edges of a previous step.


 Step 19: To ensure the base is formed correctly, fold and unfold the lower point on a crease connecting the outer lower corner of the basket.


Step 20: Gently open out the basket by separating two handle sections apart and hollowing out the final shape. Pinch creases where necessary to give a pleasing final form. Curve the handle and continue shaping the model.


The completed Basket