About Me

My photo
YING HUEY SEIN D20102044767 EL-W06

Monday 28 November 2011

Christmas Tree

After we learn the way to make snowman
Now let us make a Christmas tree

Snowman

Since, Christmas is coming around us
Today, let us learn to make a recycled snow doll
Please enjoy the video below.


Dog

This is an easy way to draw a dog

Step 1: draw a triangle


Step 2: Draw the face of the dog


Step 3: Draw another triangle at left hand side


Step 4: Draw the eyes, nose and mouth for the dog


 Step 5: Use a line to draw the body and legs


Step 6: Don't forget the fourth leg


Step 7: Add on the tail of the dog


Step 8: Finally, you can add a scarf for the dog

Monday 21 November 2011

Bottles

Last week, the students were asking to bring some water bottles, water color and color papers to school. They need to use these materials to make something they like.
Throughout the P&P process, all the students can actively engage because they like to carry out DIY activities or create somethings.

The products of students are shown as the pictures below.


A pig, A rocket and an octopus


A twin tower and a lantern

A bear and a pinwheel

Paper Mat

The way of weave a paper mat is shown as the video below.

Please enjoy the video.

Color

Colors affect us in numerous ways, both mentally and physically. A strong red color has been shown to raise the blood pressure, while a  blue color has a calming effect.
Being able to use colors consciously and harmoniously can help you create spectacular results.
The color wheel or color circle is the basic tool for combining colors. The first circular color diagram was designed by Sir Isaac Newton in 1666.

A color wheel (also referred to as a color circle) is a visual representation of colors arranged according to their chromatic relationship. Begin a color wheel by positioning primary hues equidistant from one another, then create a bridge between primaries using secondary and tertiary colors.
These terms refer to color groups or types:
Primary, Secondary and Tertiary Colors


In the RYB (or subtractive) color model, the primary colors are red, yellow and blue.


The three secondary colors (green, orange and purple) are created by mixing two primary colors.


Another six tertiary colors are created by mixing primary and secondary colors.

Sunday 20 November 2011

Puppet beak

By playing freely with the shape of the Puppet Beak's eyes and mouth, you can create many different models.

Begin with a square of origami paper, white side up.

 Step 1: By bringing two adjacent corners together, make two pinches on two adjacent edges.


Step 2: Now pinch two quarter creases, one above the bottom left corner and the other to the right of the top left corner.


 Step 3: Fold dot to dot, making one quarter mark touch the other, but only make a short pinch...


 Step 4: ... like this. The pinch shouldn't be longer than the arrowed line. Open the paper.


 Step 5: Note the five pinches. Create and unfold the diagonal, as shown. Be careful not to crease the other diagonal by mistake!


 Step 6:  Fold dot to dot as shown, beginning the fold exactly at the end of the sloping pinch, inside the circle.


 Step 7: Fold dot to dot.


 Step 8: The paper has been divided into exactly thirds! Unfold the triangles.


 Step 9: Turn over. 


 Step 10: Make four short valley folds, folding dot to dot, as shown.


Step 11: Mountain fold the paper in half. The fold already exists.


 Step 12: Hold the paper as shown. Push the left-hand corner inside the body of the paper, using the existing mountain and valley folds. No new folds need to be made.


Step 13: Repeat step 12 on the right.


 Step 14: Fold up the bottom corner. Repeat behind.


 Step 15: Fold the bottom edge up to the top edge. Repeat behind.


 Step 16: Front and back, valley fold the loose triangles into the corner...


Step 17: ... like this.  Open the paper to the final 3-D shape.


Step 18: Draw eyes (and maybe nostrils, a tongue inside the mouth, and so on). Hold two of the triangles as shown and move your hands together and apart to make the model speak. 


Puppet Beak completed!!

Sunday 13 November 2011

Class activity for mooncake festival

During mooncake festival, the students are provided a set of material for making a lantern by teacher. Throughout the P&P process, all the students can actively engage because they like to carry out DIY activities or create somethings.


The works of students and the process of making the lantern are shown as the photo below.


Sunflower

This is an easy way to draw a sunflower.

 step 1: Draw a circle


 Step 2: Add on the mesh pattern inside the circle that you drawn.


 Step 3: Draw a petal with sharp tip


 Step 4: Continue with draw the other petals around the circle.


 Step 5: Draw a large leaf


Step 6: Add a root and one more leaf, it's a completed sunflower.

Thursday 10 November 2011

Basket


This model was designed by Aldo Putignano, and is one of a large collection of baskets, bowls and other containers created by this prolific folder. It is a classic to share around Easter time, and looks delightful filled with shredded yellow tissue and chocolate eggs. You will need a square of paper, preferably duo-colored, and a strip of paper approximately the same length as a side of the square (see step 8).


 Step 1: Begin with a Preminary base, the outer color will be the outer color of the finished basket. The closed point should be towards you.


 Step 2: Fold the single layer at the top down to the closed point at the bottom.


 Step 3: Fold the corner back up to horizontal center line.


 Step 4: Mountain fold the point inside, down as far as the crease made in the previous step. You might prefer to open out this triangular flap and use a valley crease, before refolding to the position shown.


 Step 5: Double over the lower edge once more, producing a fairly thickly layered band around the middle of the model. Repeat steps 2-5 on the reverse face.


 Step 6: There are two main flaps on either side of the vertical center line. Fold the top flap at the right over to the left, using the vertical center crease as a hinge crease and axis. Turn over and repeat on the reverse, again folding right over to left.


Step 7: Repeat steps 2-4 on the two new faces.


Step 8: Take a strip of paper, ideally the length of one side of the square you began folding the basket from. The width is up to you, but if you are using A4 (21x29cm/8 1/4 x 11 1/2 inch) paper, you might consider using the portion cut off in making a square, sliced in half, short end to short end. Fold the two long edges to the center. Then fold in half again, so that the handle is fairly stiff.


 Step 9: Insert one end of the handle behind the flaps we formed as part of step 4. Push right down, until it can go no further.


 Step 10: Repeat step 5, doubling the section over, and locking the handle into place. Repeat steps 9-10 on the reverse face.


 Step 11: Double over this entire section again, further locking the handle in place through the multiple creasing. Repeat on the reverse side.


 Step 12: Fold the two outer corners of the upper layer inward to meet with the vertical center line, at the top edge of the basket. Repeat on the reverse face.


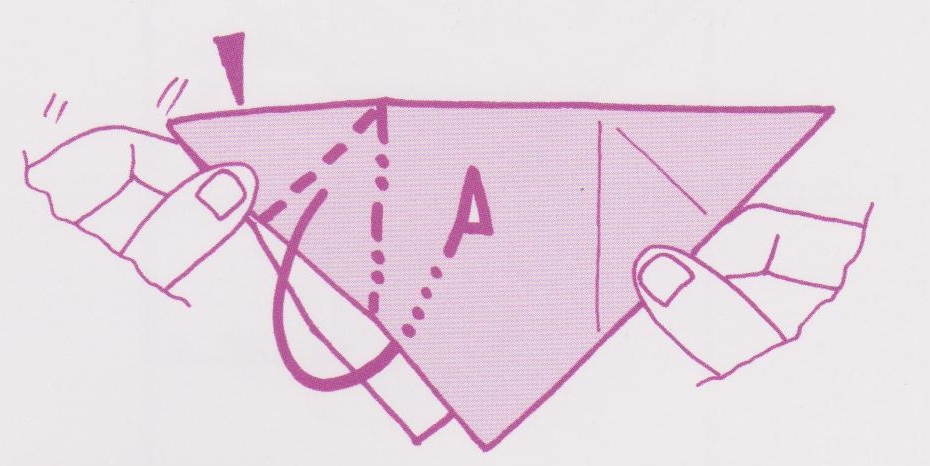
 Step 13: As you look at the model you will see that there are two diamond shapes close to the top of the basket. Take hold of the top inner corner of this flap, and pull it towards you, making a crease that runs along the lower sloping edge. This will seem a fairly natural step. Repeat with the neighboring flap.


 Step 14: Allow the horizontal folded edge behind the flaps to fold over to the front, squashing it flat on top of the two sections you have just folded. Repeat steps 13 and 14 on the reverse face.


 Step 15: Steps 13 and 14 completed.


 Step 16: There are now small flaps projecting outward from the natural shape of the basket. Mountain-fold all four behind and inside on themselves, using the edge of the basket as a guide (you might fold them over the basket's edge first, then refold, tucking them just behind the outer layer).


 Step 17: Step 16 completed.


 Step 18: This now leaves four small flaps pointing upward. Mountain fold these, and insert into a small triangular pocket that you will find behind them, formed by the diagonal folded edges of a previous step.


 Step 19: To ensure the base is formed correctly, fold and unfold the lower point on a crease connecting the outer lower corner of the basket.


Step 20: Gently open out the basket by separating two handle sections apart and hollowing out the final shape. Pinch creases where necessary to give a pleasing final form. Curve the handle and continue shaping the model.


The completed Basket