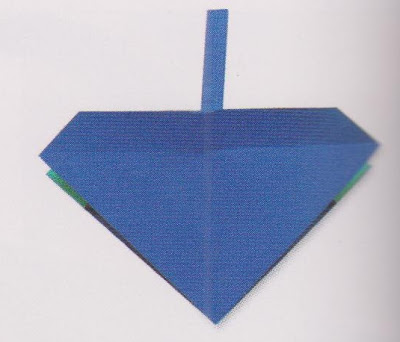
This model was designed by Aldo Putignano, and is one of a large collection of baskets, bowls and other containers created by this prolific folder. It is a classic to share around Easter time, and looks delightful filled with shredded yellow tissue and chocolate eggs. You will need a square of paper, preferably duo-colored, and a strip of paper approximately the same length as a side of the square (see step 8).
Step 1: Begin with a Preminary base, the outer color will be the outer color of the finished basket. The closed point should be towards you.
Step 2: Fold the single layer at the top down to the closed point at the bottom.
Step 3: Fold the corner back up to horizontal center line.
Step 4: Mountain fold the point inside, down as far as the crease made in the previous step. You might prefer to open out this triangular flap and use a valley crease, before refolding to the position shown.
Step 5: Double over the lower edge once more, producing a fairly thickly layered band around the middle of the model. Repeat steps 2-5 on the reverse face.
Step 6: There are two main flaps on either side of the vertical center line. Fold the top flap at the right over to the left, using the vertical center crease as a hinge crease and axis. Turn over and repeat on the reverse, again folding right over to left.
Step 7: Repeat steps 2-4 on the two new faces.
Step 8: Take a strip of paper, ideally the length of one side of the square you began folding the basket from. The width is up to you, but if you are using A4 (21x29cm/8 1/4 x 11 1/2 inch) paper, you might consider using the portion cut off in making a square, sliced in half, short end to short end. Fold the two long edges to the center. Then fold in half again, so that the handle is fairly stiff.
Step 9: Insert one end of the handle behind the flaps we formed as part of step 4. Push right down, until it can go no further.
Step 10: Repeat step 5, doubling the section over, and locking the handle into place. Repeat steps 9-10 on the reverse face.
Step 11: Double over this entire section again, further locking the handle in place through the multiple creasing. Repeat on the reverse side.
Step 12: Fold the two outer corners of the upper layer inward to meet with the vertical center line, at the top edge of the basket. Repeat on the reverse face.
Step 13: As you look at the model you will see that there are two diamond shapes close to the top of the basket. Take hold of the top inner corner of this flap, and pull it towards you, making a crease that runs along the lower sloping edge. This will seem a fairly natural step. Repeat with the neighboring flap.
Step 14: Allow the horizontal folded edge behind the flaps to fold over to the front, squashing it flat on top of the two sections you have just folded. Repeat steps 13 and 14 on the reverse face.
Step 15: Steps 13 and 14 completed.
Step 16: There are now small flaps projecting outward from the natural shape of the basket. Mountain-fold all four behind and inside on themselves, using the edge of the basket as a guide (you might fold them over the basket's edge first, then refold, tucking them just behind the outer layer).
Step 17: Step 16 completed.
Step 18: This now leaves four small flaps pointing upward. Mountain fold these, and insert into a small triangular pocket that you will find behind them, formed by the diagonal folded edges of a previous step.
Step 19: To ensure the base is formed correctly, fold and unfold the lower point on a crease connecting the outer lower corner of the basket.
Step 20: Gently open out the basket by separating two handle sections apart and hollowing out the final shape. Pinch creases where necessary to give a pleasing final form. Curve the handle and continue shaping the model.
The completed Basket


No comments:
Post a Comment